How Can We Help?
Instant Fax ATA
If you need to send/receive faxes from a Fax machine, we recommend using Instant Fax ATA’s as a part of your fax solution. An Instant Fax ATA is a propriety piece of hardware that plugs into ethernet and RJ11 from the fax machine to send Fax Over IP.
What is an Instant Fax ATA?
Also known as a Store-and-Forward device, an Instant Fax ATA increases the overall success rate of faxing dramatically by; allowing faxes to be buffered before being transmitted to and from an analog fax machine.
- For Inbound (DID) calls, faxes are received in the Nex Gen Telecom data center (where last-mile latency and jitter issues are not a concern) by a Store-and-Forward fax server. After receipt, they are transmitted to the ATA using a file transfer protocol that is not susceptible to latency and jitter concerns. Once the ATA receives the files, they are relayed to a local fax machine that is connected to the ATA with standard RJ-11 cabling.
- For Outbound (Termination) calls, faxes from a local fax machine are intercepted and stored by the ATA and then transferred to a Store-and-Forward fax server in the Nex Gen Telecom data center using a file transfer protocol that is not susceptible to latency and jitter concerns. From the fax server, they are relayed to the PSTN using dedicated fax carriers. There is also failover routing, so if the first carrier fails to deliver the Fax, there are three or more dedicated fax carriers in place to attempt the Fax.
Instant Fax ATAs differ from a SIP ATA that uses SIP and T.38/G.711 to transmit the Fax. The Instant FAX ATA converts fax tones to a file locally, then sends it securely to a server. The server handles the routing and delivery for inbound and outbound faxes with dedicated routing.
It is technically possible to send faxes through a SIP ATA that is registered to our PBX with T.38 or G.711, but there are several reasons that we recommend against that solution.
- T.38 and G.711 are submitted over UDP and are highly susceptible to Jitter and Packet loss. Small issues that don’t impact a voice call can be devastating to a Fax.
- Our normal SIP call routing does not include dedicated Fax routes, meaning the carriers may not allow or handle T.38, resulting in lower success rates.
- Many carriers (and SIP ATAs) do not negotiate T.38 properly resulting in the faxes failing seconds after they start.
For the reasons stated above, we do not support the sending of Faxes from SIP ATAs and they should be used at your own risk.
Instant FAX ATA transmission is TLS encrypted and is considered as HIPAA compliant for sending or receiving faxes. HIPAA compliance requires policies & procedures. A technology solution alone is simply not enough to be HIPAA compliant.
Hardware Information and Connection Guide
We recommend provisioning the device in the Telco Phone Numbers Portal before powering the device on for the first time. The device will then grab it’s configuration and firmware files on first boot.
This guide will explain how to configure the Instant Fax ATA device for use with the Nex Gen Telecom Fax system.
This procedure applies to the white (3001R) ATA units only.
Use the following steps to connect your ATA to the service.
- Connect the ATA WAN port to your network using a standard ethernet cable.
- Connect the ATA FAX port to your fax machine using the included RJ11 Cable.
- Connect the ATA to the power using the included Power Adapter.
- Power it on and wait at least 10-15 minutes. It is often necessary for the device to download new firmware.
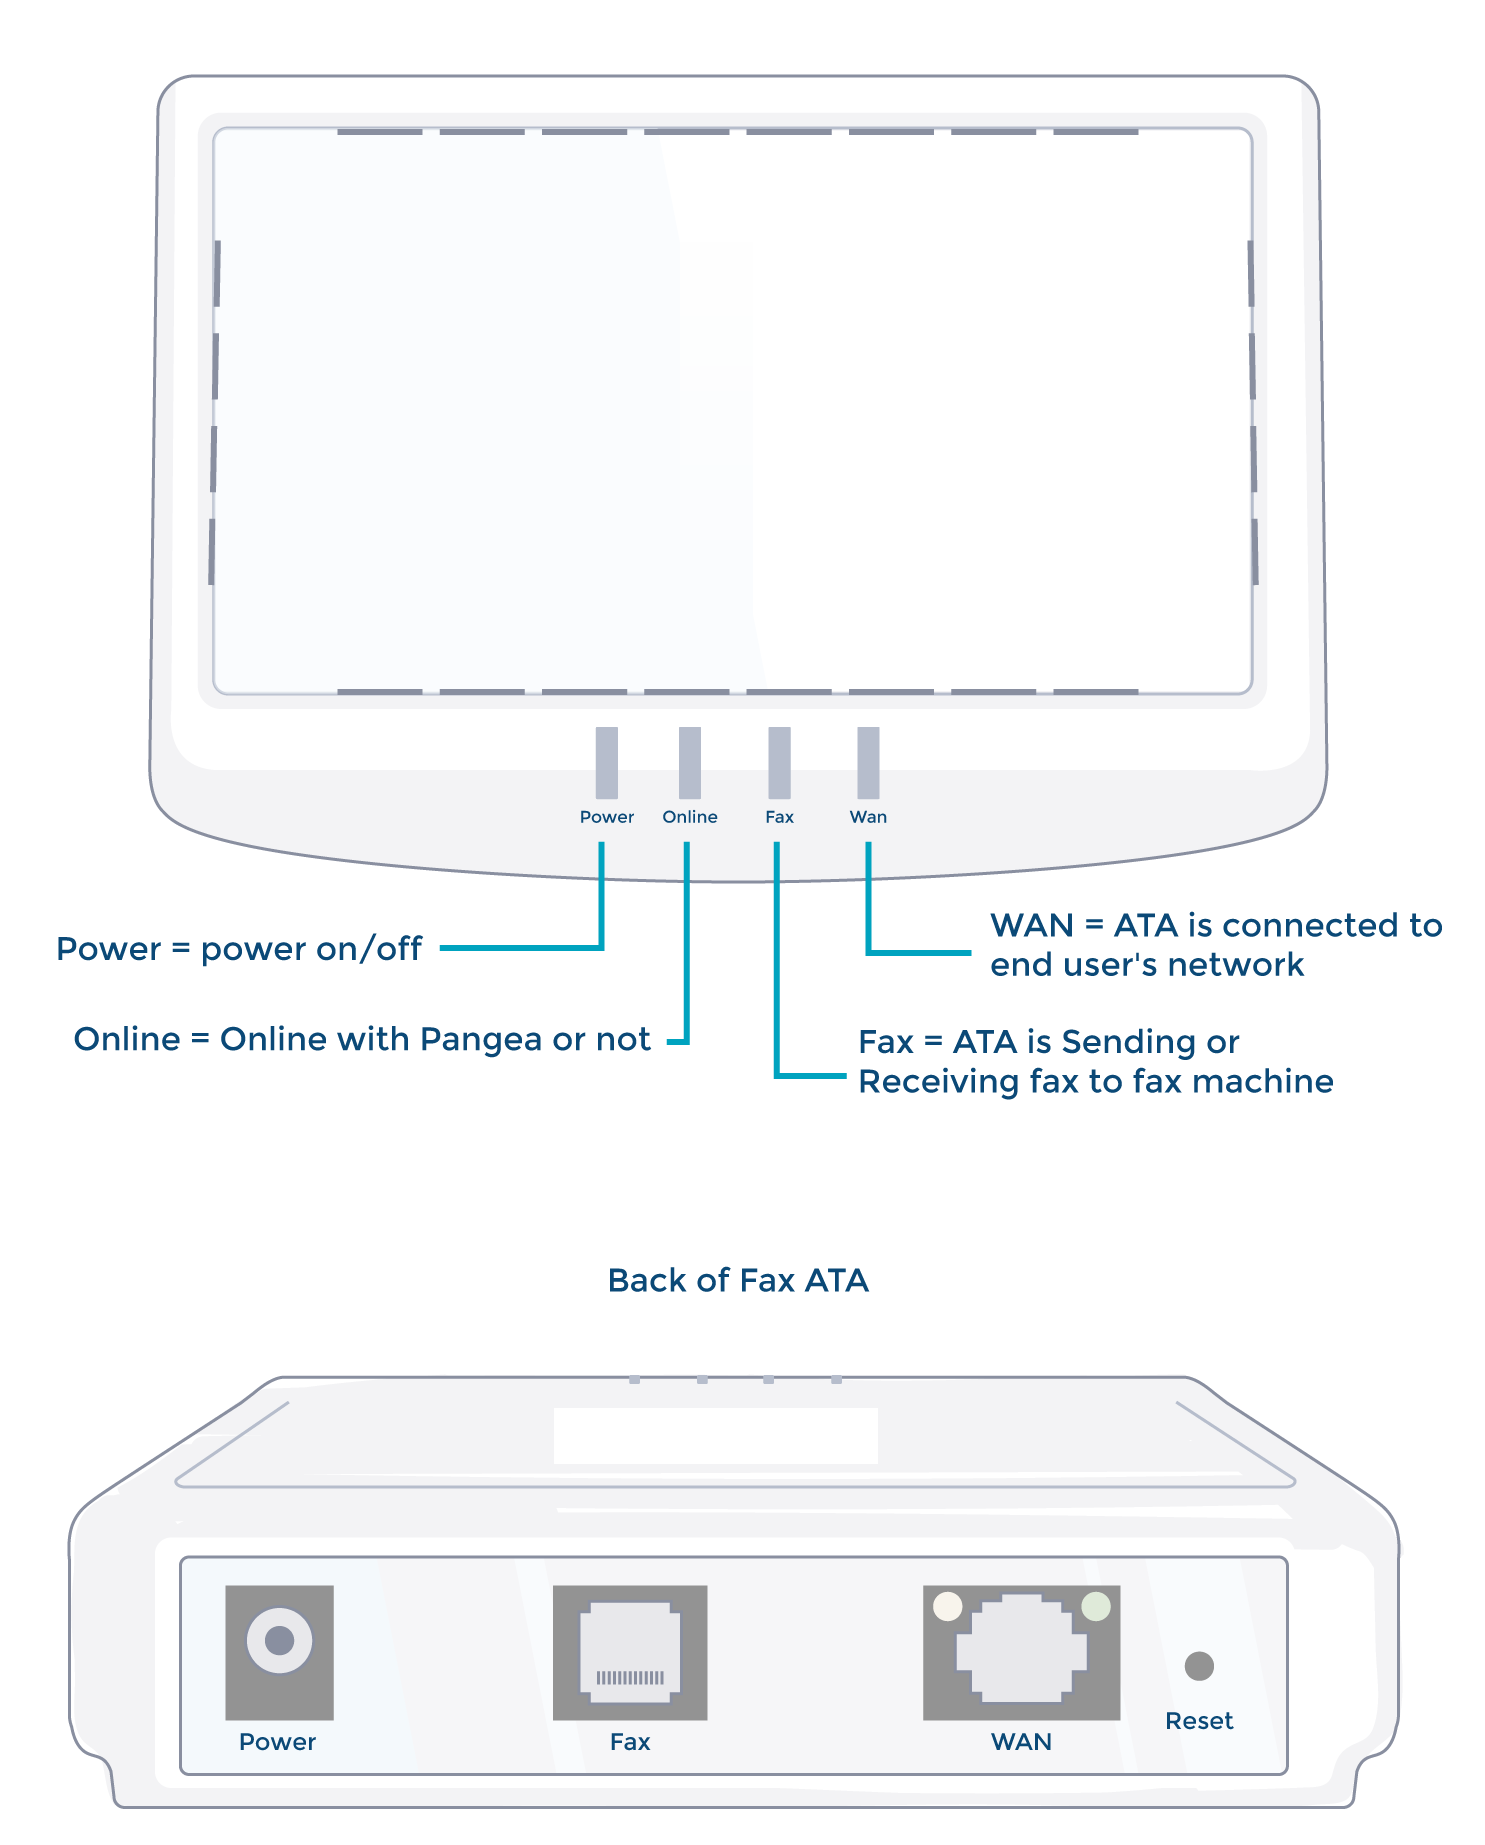
- After waiting for the 10-15 minutes, you should see POWER, ONLINE, and WAN lights on and green.
- Pick up the handset of your fax machine (or analog phone for testing). You should see FAX light on and green, and also hear the dial tone.
- Hang up the handset, and the FAX light should turn off. At this point, the Instant Fax ATA should be ready to go!
- We recommend turning off Fax completion messages from the local Fax Machine because the Fax machine will always think the faxes were delivered properly. If you are wanting confirmation messages, they can be set up in the Telco Phone Numbers Portal.
Provisioning an Instant Fax ATA in the Telco Phone Numbers Portal (Nex Gen Telecom staff only)
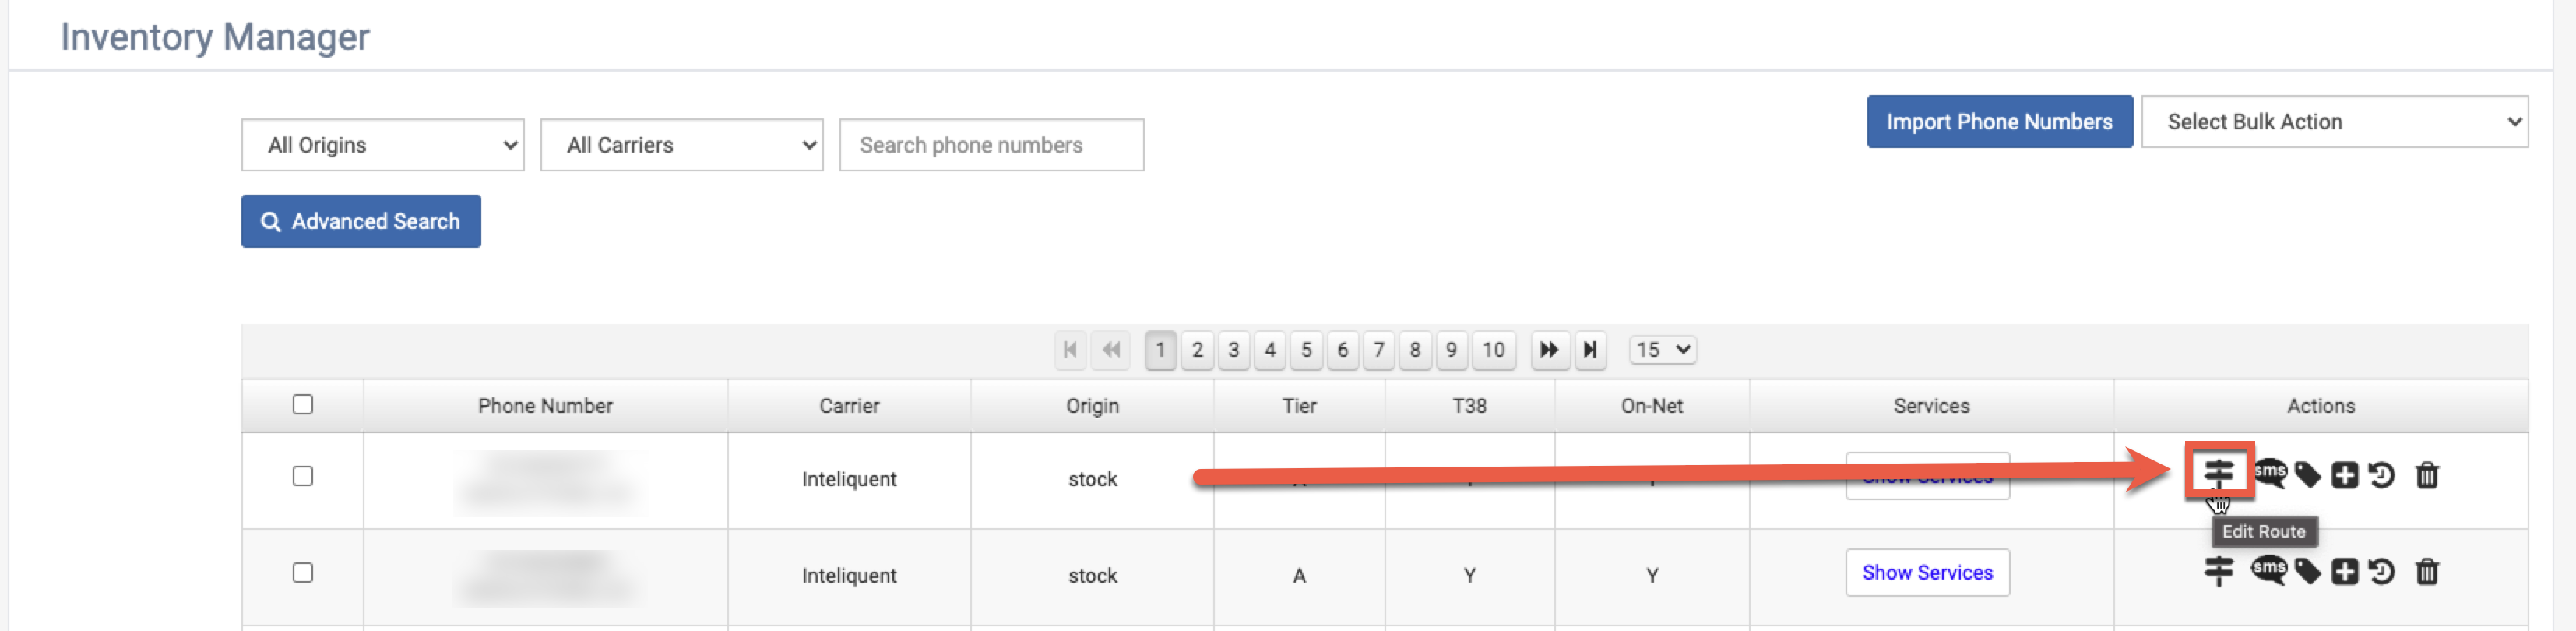
You can provision and manage Instant Fax ATAs from the Telco Phone Numbers portal in the Dashboard.
- From ‘Manage Inventory,’ choose any number and manage the call routing by clicking the street sign icon.
- From the Fax tab, choose the radio button labeled Instant Fax ATA.
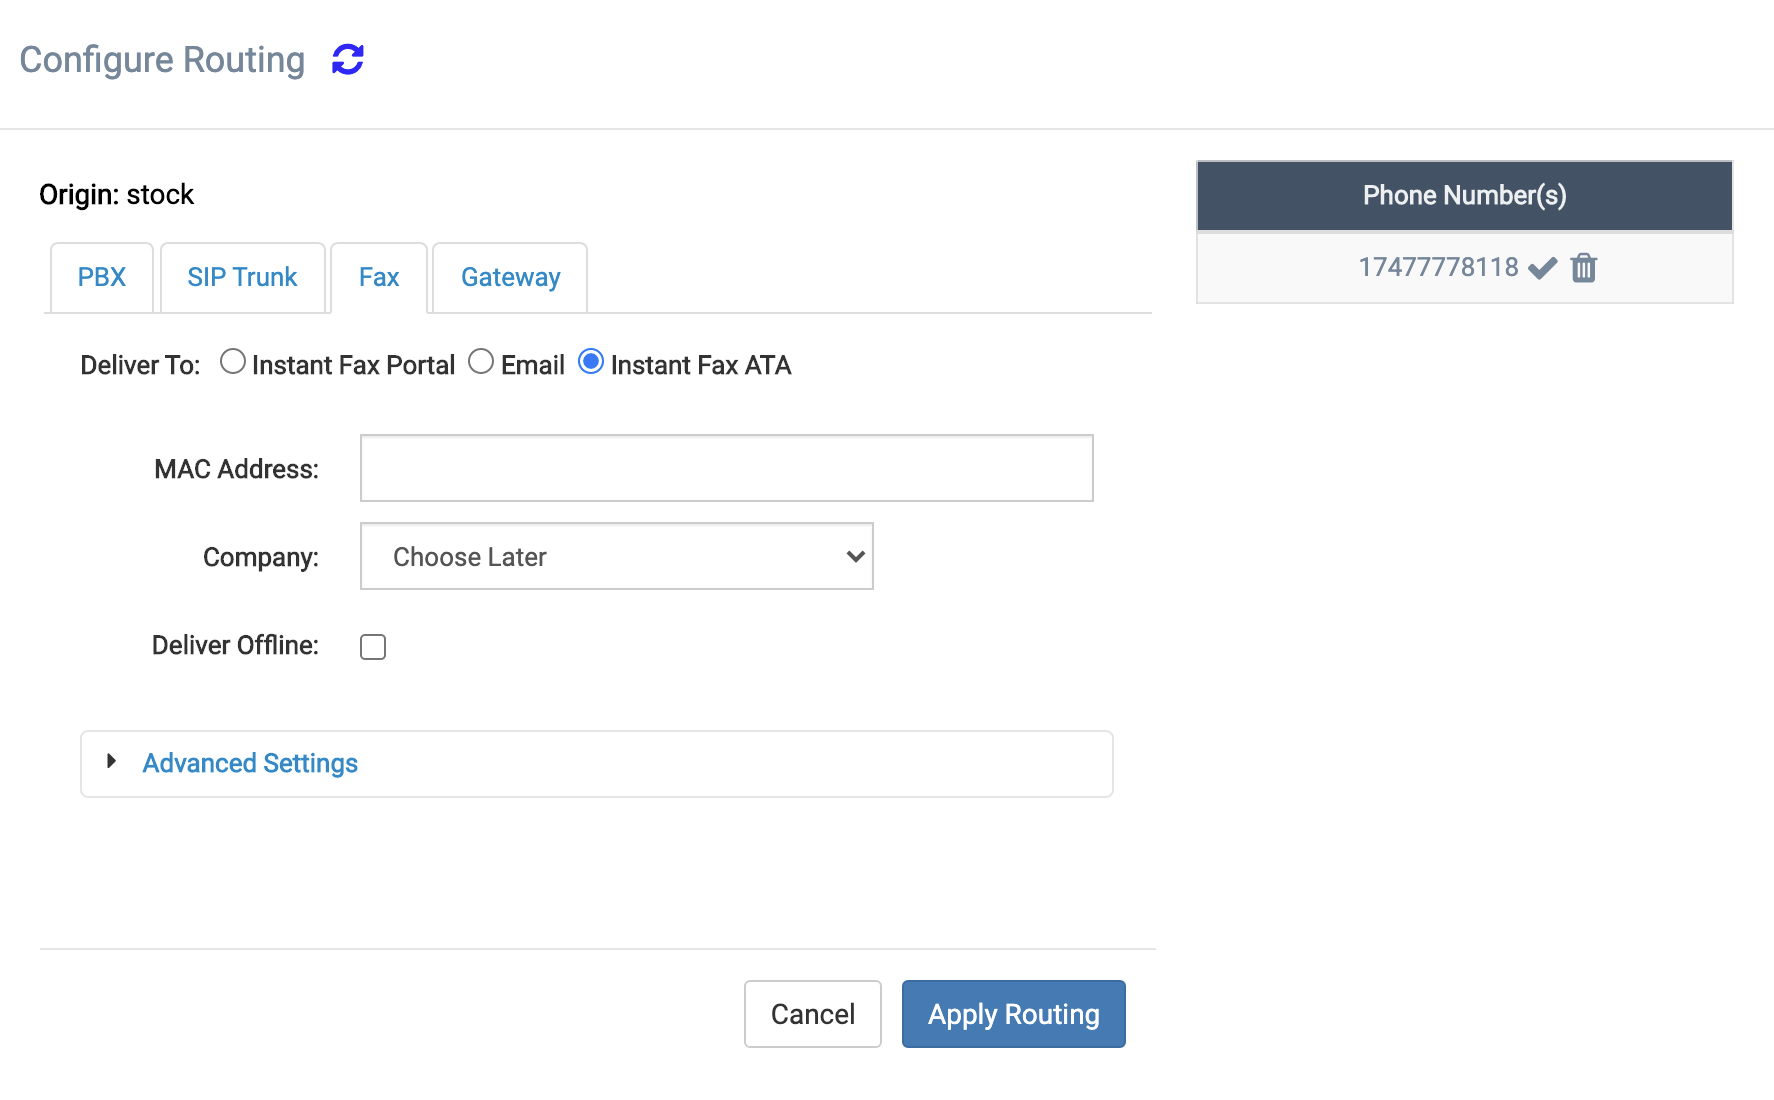
- Enter the ATA’s Mac address, the Domain (Company), and if you would like to Deliver Offline. If Deliver Offline is checked the system controls whether inbound faxes will be accepted and held for later delivery if the Fax ATA device is offline. If this option is not chosen, then the fax caller will hear a busy signal when the Fax ATA device is offline.
- Choose advanced options for email deliverability and confirmation options.
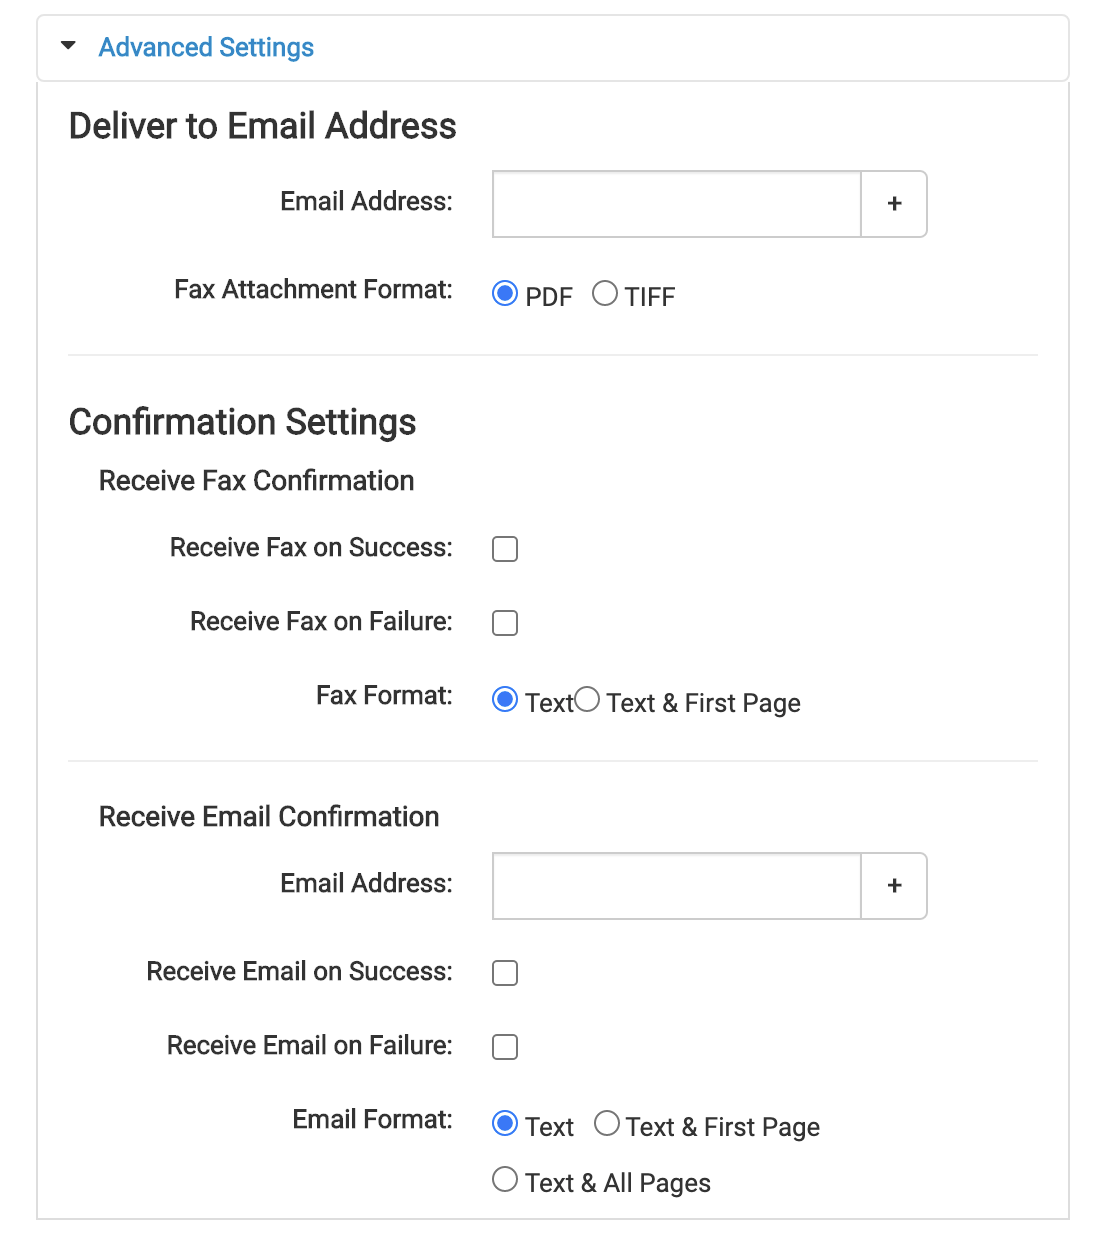
- Deliver to Email Address – this section is used to set one or more email addresses to receive faxes by clicking the plus (+) button to add or the minus (-) button to remove an email. You can then select the format in which they are delivered (PDF or TIFF).
- Confirmation Settings – this section is used for setting up how a confirmation message will be sent whether via fax, email, or both for when the delivery of a fax is successful or not. The format for the confirmation can also be set to Text, Text & First Page, and Text & All Pages (for email confirmation only).
- After clicking on ‘Apply Routing’, you should see a success message showing that the number has been routed. Upon routing, the configuration file for the ATA is built on the Fax server.

- Plugin and use your ATA! We recommend connecting ethernet before power. Remember to wait 10-15 minutes after plugging in the ATA in case a firmware update was required.